تحاول أبل دائمًا تحسين الكاميرا على الآي-فون عن طريق ترقية العتاد الخاص بها أو عن طريق النظام. ومع ذلك، يرى البعض أن الكاميرا لا تعمل بكل طاقتها أو استخدام كل ما لديها من مميزات. وهذا يرجع إلى عدم الإلمام بكل ما يخص تطبيق الكاميرا وكيفية عمله وجميع المميزات التي تحتاج تمكينها أو تعطيلها لتعطي لك الجودة المثالية للصورة. هناك العديد من المميزات والإعدادات التي يمكنك اللعب بها من أجل تحسين الصور الملتقطة. فقد يكون تمكين ميزة معينة يؤثر بشكل سيء على الصورة والعكس قد يتم تعطيل ميزة معينة فتصبح الصورة مثالية. وقد يكون الوضع الافتراضي أيضا ليس في صالح عملية التصوير. إذا كنت تريد الانتقال بكاميرا الآي-فون إلى مستوى أعلى، فستحتاج إلى فهم ما تتعامل معه. تابع المقال للتعرف على خمس نصائح وحيل تحتاج إلى تجربتها على كاميرا الآي-فون لتقديم صور مثالية.
التصوير السريع يأتي على حساب الجودة

أحد أفضل الأشياء في كاميرا الآي-فون هو مدى سهولة وسرعة التقاط الصور. يمكنك النقر فوق زر الالتقاط وسوف يلتقط صورة على الفور، أو حتى استخدام ميزة Burst لالتقاط عدد لا نهائي من اللقطات بسرعة من خلال استخدام زر رفع الصوت.
ومع ذلك، قد لا تكون الصورة جيدة بسبب تلك السرعة. ومع التقاط العديد من الصور بهذه الطريقة، قد تحتاج إلى المقارنة بينها للحصول على واحدة ذات جودة عالية. وهذا مربك نوعا ما، هذا غير الوقت المستهلك في كل عملية ناهيك عن الملل الناتج من وراء تلك العملية.
يمكنك تغيير هذا بحيث يعطي الآي-فون الأولوية للجودة بدلاً من التصوير السريع من خلال:
◉ الإعدادات Settings.
◉ الكاميرا Camera.
◉ قم بالتمرير لأسفل وتعطيل إعطاء الأولوية للتصوير السريع Prioritize Faster Shooting.
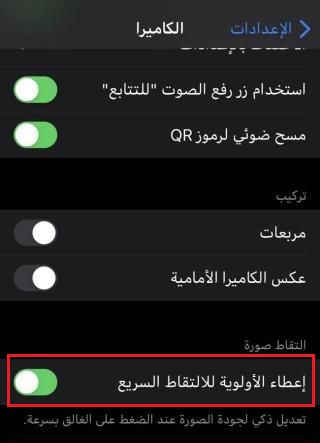
إذا قمت بتعطيل إعطاء الأولوية للتصوير السريع، فسيقوم الآي-فون بالتقاط صور بجودة أعلى ولكنه لن يلتقط الصور بالسرعة السابقة. ستحتاج إلى اختباره وتحديد ما إذا كنت تفضل الجودة على الكمية، ولكن للتصوير السريع ميزات أخرى لا يسع المقال لذكرها.
إتقان التصوير باستخدام الوضع الليلي
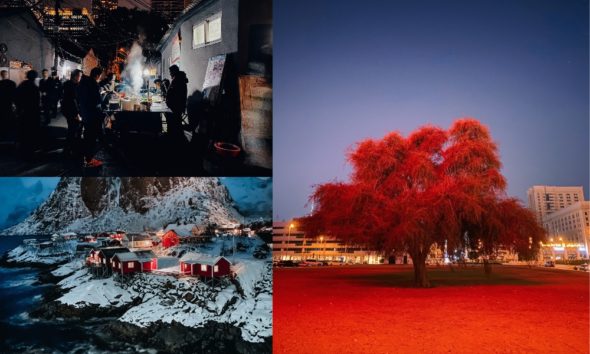
الوضع الليلي هو ميزة جديدة إلى حد ما، أطلقتها أبل في عام 2019. تساعدك هذه الميزة على التقاط صور أفضل في بيئات الإضاءة المنخفضة، ولا شك أنك استخدمتها بالفعل.
الوضع الليلي هو ميزة تلقائية ينشطها الآي-فون عندما يكتشف الإضاءة المنخفضة. ومع ذلك، لا يزال هناك بعض الأشياء التي يمكنك القيام بها لمساعدة الوضع الليلي على التقاط صور أفضل.
أولاً، حاول تثبيت الكاميرا. كلما قللت من تحريكها، كانت اللقطة أفضل.
ثانيا، يمكنك ضبط توقيت الوضع الليلي لجلب إضاءة أكثر أو أقل.
يضبط الوضع الليلي تلقائيًا الوقت الذي سوف تستغرقه لالتقاط صورة اعتمادًا على مدى ظلام البيئة. ومع ذلك، يمكنك تغييره يدويًا لالتقاط صورة أفضل. فقم بالتالي:
◉ افتح الكاميرا Camera.
◉ قبل التقاط صورة في الإضاءة المنخفضة، اضغط على أيقونة الوضع الليلي الموجودة في الزاوية العليا من شاشتك. يجب أن يكون أصفر.
◉ سترى شريط تمرير أعلى زر الالتقاط. حركه إلى اليسار أو اليمين لزيادة أو تقليل المؤقت أو إيقاف تشغيله تمامًا.
قبل تجربة ذلك، ضع في اعتبارك أن الوضع الليلي متاح فقط على آي-فون 11 و آي-فون 12.
اجعل الكاميرا الأمامية كالمرآة
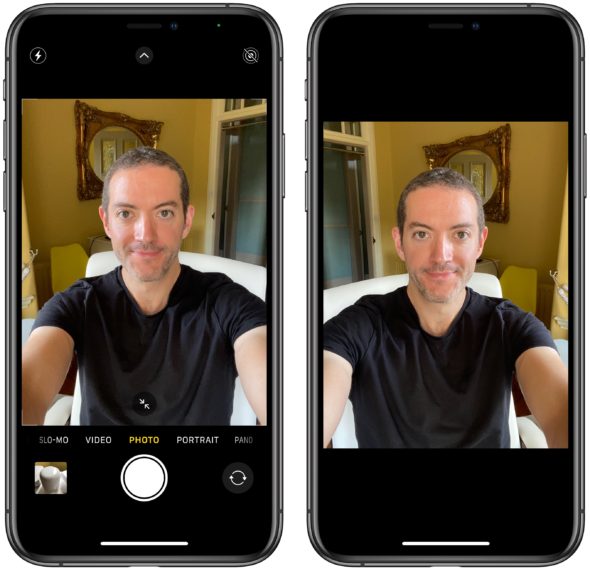
قد تكون الكاميرا الأمامية على الآي-فون غريبة بعض الشيء عند التقاط صور سيلفي. فعندما تلتقط صورة سيلفي، سترى نفسك كما لو كنت تنظر في المرآة. ولكن عندما تتحقق من الصورة في تطبيق الصور، ستراها بالعكس.
على سبيل المثال، إذا التقطت صورة شخصية ترفع فيها يدك اليمنى لأعلى، فسيعرض لك تطبيق الكاميرا نسخة معكوسة لنفسك. لكن بمجرد أن ترى الصورة في تطبيق الصور، ستراها كما لو كنت ترفع يدك اليسرى.
يمكنك في الواقع تغيير هذا حتى تظهر صورك الشخصية نسخة معكوسة لنفسك. إليك كيف يمكنك القيام بذلك:
◉ افتح الإعدادات Settings.
◉ قم بالتمرير لأسفل وانتقل إلى الكاميرا Camera.
◉ ضمن التكوين Composition، قم بتمكين عكس الكاميرا الأمامية Mirror Front Camera.
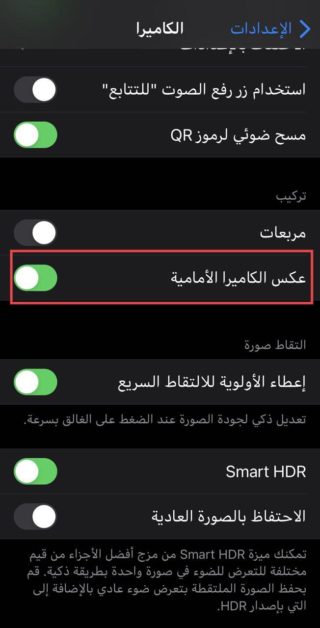
ضع في اعتبارك أنه لا يمكنك استخدام هذه الميزة إلا على أجهزة آي-فون XR و آي-فون XS و آي-فون XS ماكس والأحدث.
اختبار أبل ProRAW
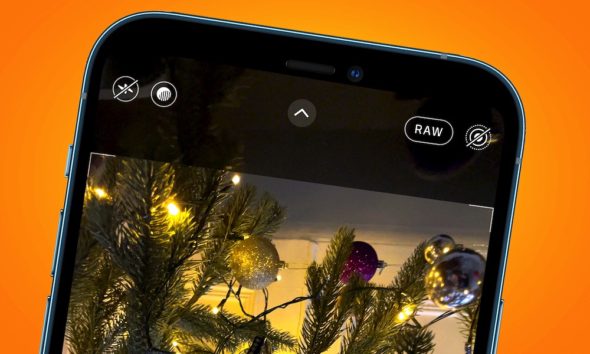
تعد أبل ProRAW إحدى المميزات الحصرية لآي-فون 12 برو وآي-فون 12 برو ماكس. لقد تحدثنا عن هذه الميزة من قبل، لكنها في الأساس نوع من ملفات الصور الخام تمامًا، مع القليل من التعديلات من برنامج الكاميرا.
هذا يعني أنه يمكنك تحرير صورك تمامًا كما تريد. بالطبع، يستغرق هذا مزيدًا من الوقت والجهد، ولكن إذا كنت تعمل في التصوير الفوتوغرافي، فعليك تجربة هذه الميزة.
إليك كيفية تمكين أبل ProRaw على جهاز آي-فون 12 برو أو آي-فون 12 برو ماكس:
◉ افتح الإعدادات Settings.
◉ قم بالتمرير لأسفل وحدد الكاميرا Camera.
◉ اضغط على التنسيقات Formats.
◉ تفعيل أبل ProRAW.
◉ بعد تمكينها، يمكنك تشغيل ProRAW وتشغيل تطبيق الكاميرا من خلال النقر على زر RAW في الزاوية العليا من شاشتك.
ضع في اعتبارك أن ملفات أبل ProRAW تشغل مساحة أكبر بكثير على الآي-فون، ولن يتم تحريرها مثل صورتك العادية، لذا فإن هذه الميزة ليست مثالية إذا كنت ترغب فقط في التقاط صور عادية. ومع ذلك، فإن الأمر يستحق التجربة إذا كان لديك بالفعل طراز آي-فون 12 برو.
تعلم كيفية استخدام FPS التلقائي
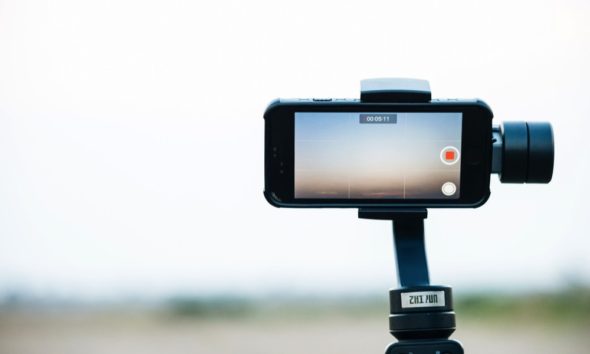
اللـ FPS أو Frames Per Second وهو عدد الإطارات أو الترددات المستخدمة لجعل الصورة متحركة. إذا كنت تحب تصوير مقاطع فيديو في الليل، فربما تكون قد لاحظت أن ملفات الفيديو الخاصة بك ليست واضحة كما ينبغي. قد تبدو بعض اللقطات باهتة بعض الشيء، فمن المحتمل أن يكون الآي-فون يحاول مساعدتك باستخدام Auto FPS.
الـ Auto FPS هي ميزة يمكنها تقليل معدل الإطارات للفيديو الخاص بك لتحسين الإضاءة المنخفضة. على الرغم من أنه قد يكون مفيدًا في بعض المناسبات، إلا أنه من الأفضل معرفة كيفية إيقاف تشغيله عند الحاجة.
◉ افتح الإعدادات.
◉ إذهب إلى الكاميرا.
◉ اضغط على تسجيل الفيديو.
◉ قم بالتمرير لأسفل وحدد Auto FPS وأغلقه.
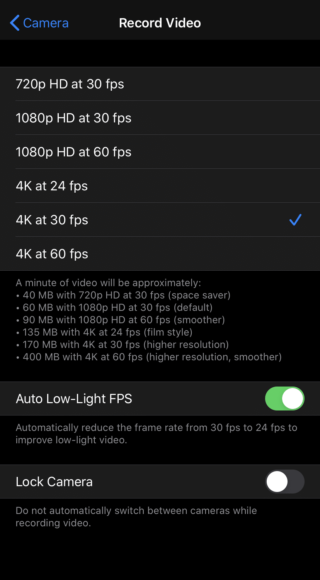
يمكنك التلاعب بهذه الميزة لمعرفة متى يجب عليك استخدام Auto FPS ومتى لا ينبغي عليك ذلك.
المصدر:
14 تعليق